Create a Virtual Machine
Deploy a virtual machine (VM) by selecting a location, operating system image, and compute configuration. You can also attach networks and allocate a public IP during creation.
Prerequisites
- The Tenant Administrator or Tenant Power User role
Navigate to Virtual Machines in the sidebar and click Create VM to open the wizard. The creation wizard includes eight steps that unlock sequentially. You can return to any completed step to make changes before deployment.
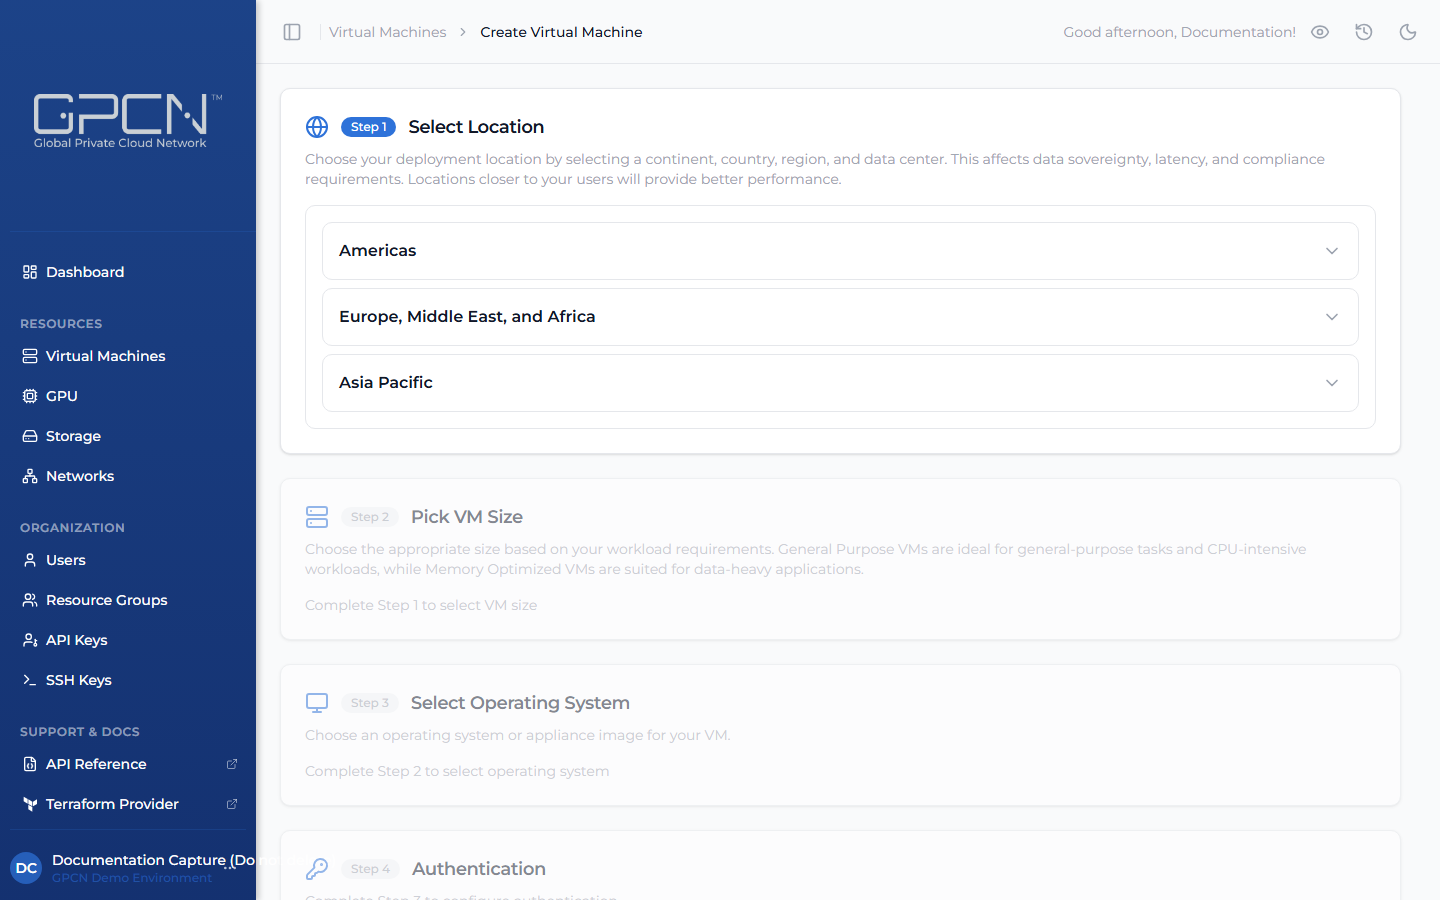
Step 1 — Select Location
Choose where your VM will be deployed. Your location determines:
- Which VM sizes and OS images are available
- Which private networks can be attached
- Data sovereignty and compliance requirements
- Network latency for your end users
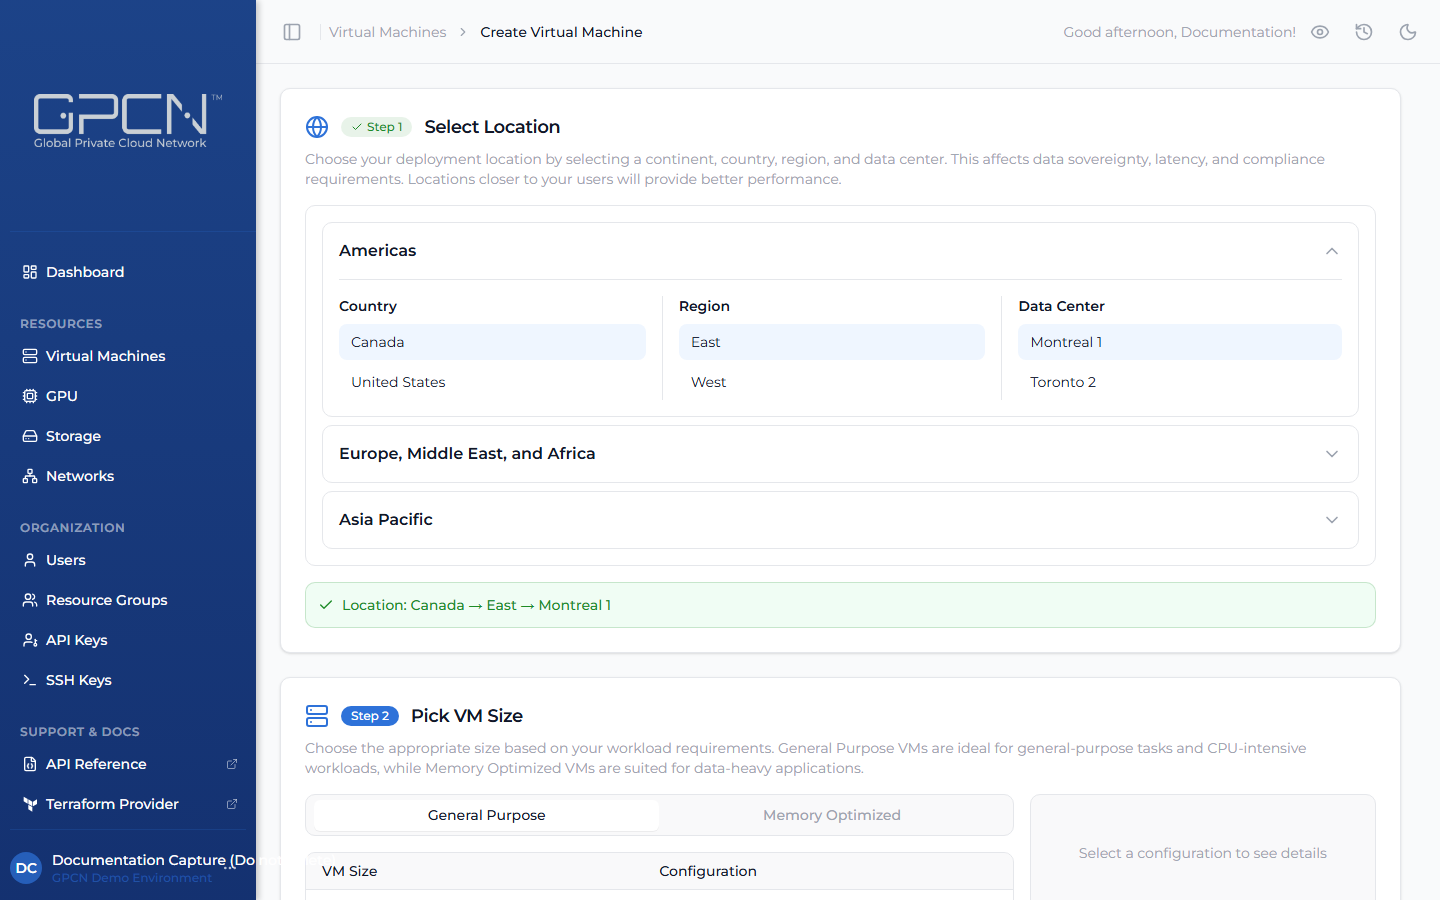
Click a continent to expand it (Americas, Europe Middle East and Africa, or Asia Pacific), then select a country, region, and data center. Selections highlight in blue as you drill down. A green confirmation bar appears at the bottom once a data center is selected, and Step 2 unlocks.
Choose a data center close to where your workload will serve traffic, or in the same location as other GPCN™ resources you need to connect to.
Step 2 — Pick VM Size
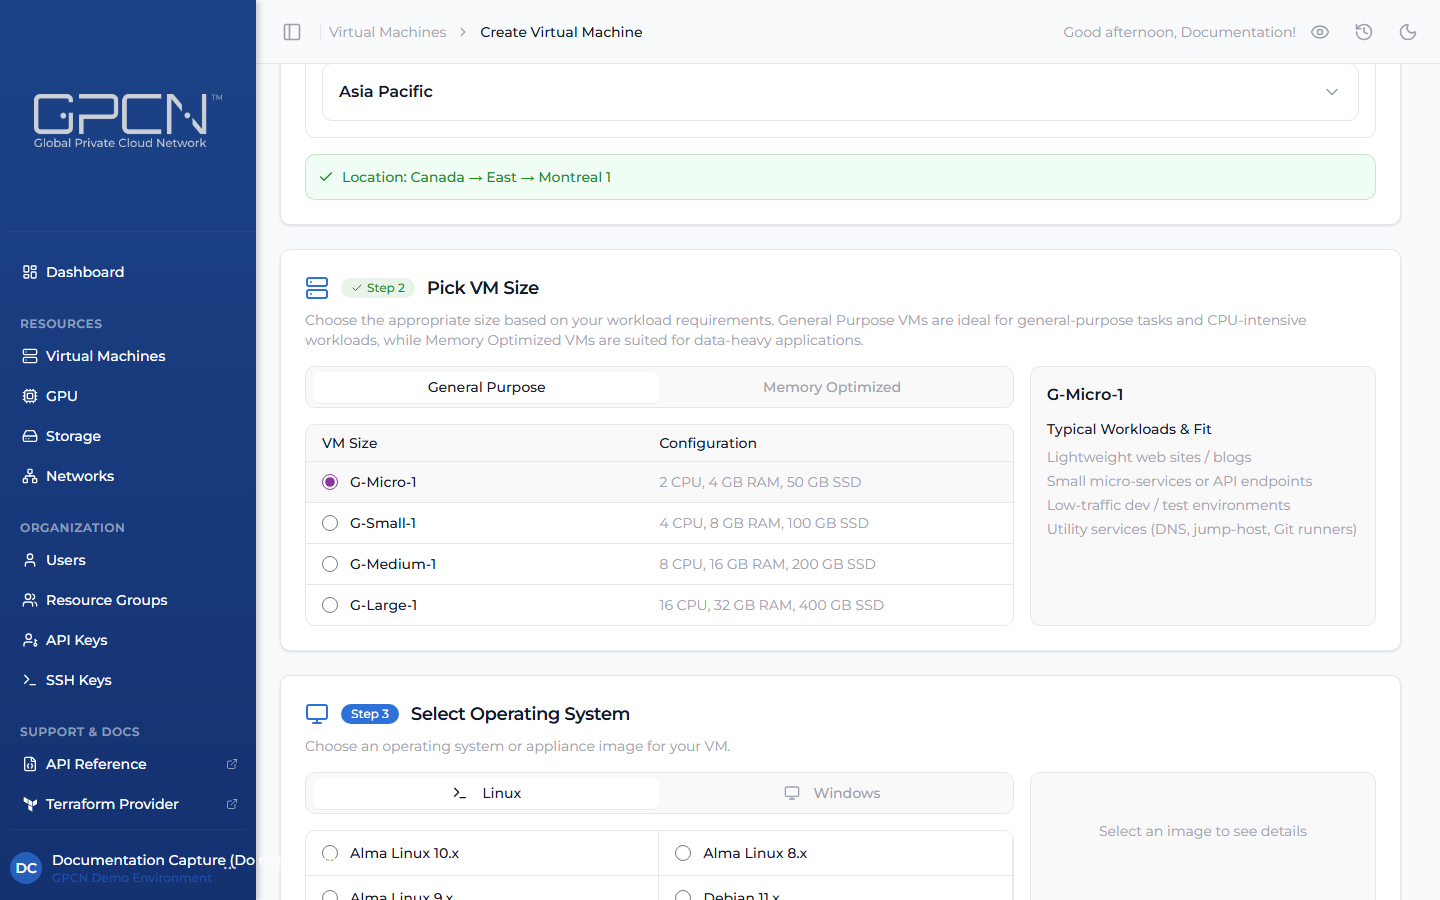
Choose the compute configuration. Two categories are available — select the tab that fits your workload:
- General Purpose — balanced CPU-to-memory ratio, suited for most applications
- Memory Optimized — higher memory per core, suited for data-heavy workloads
Clicking a row selects it and shows Typical Workloads & Fit details on the right with a short list of use cases the size is well suited for. Step 3 unlocks once a size is selected.
See Available Sizes for the full catalog of configurations.
You can upgrade a VM after creation — see Manage VMs.
Step 3 — Select Operating System
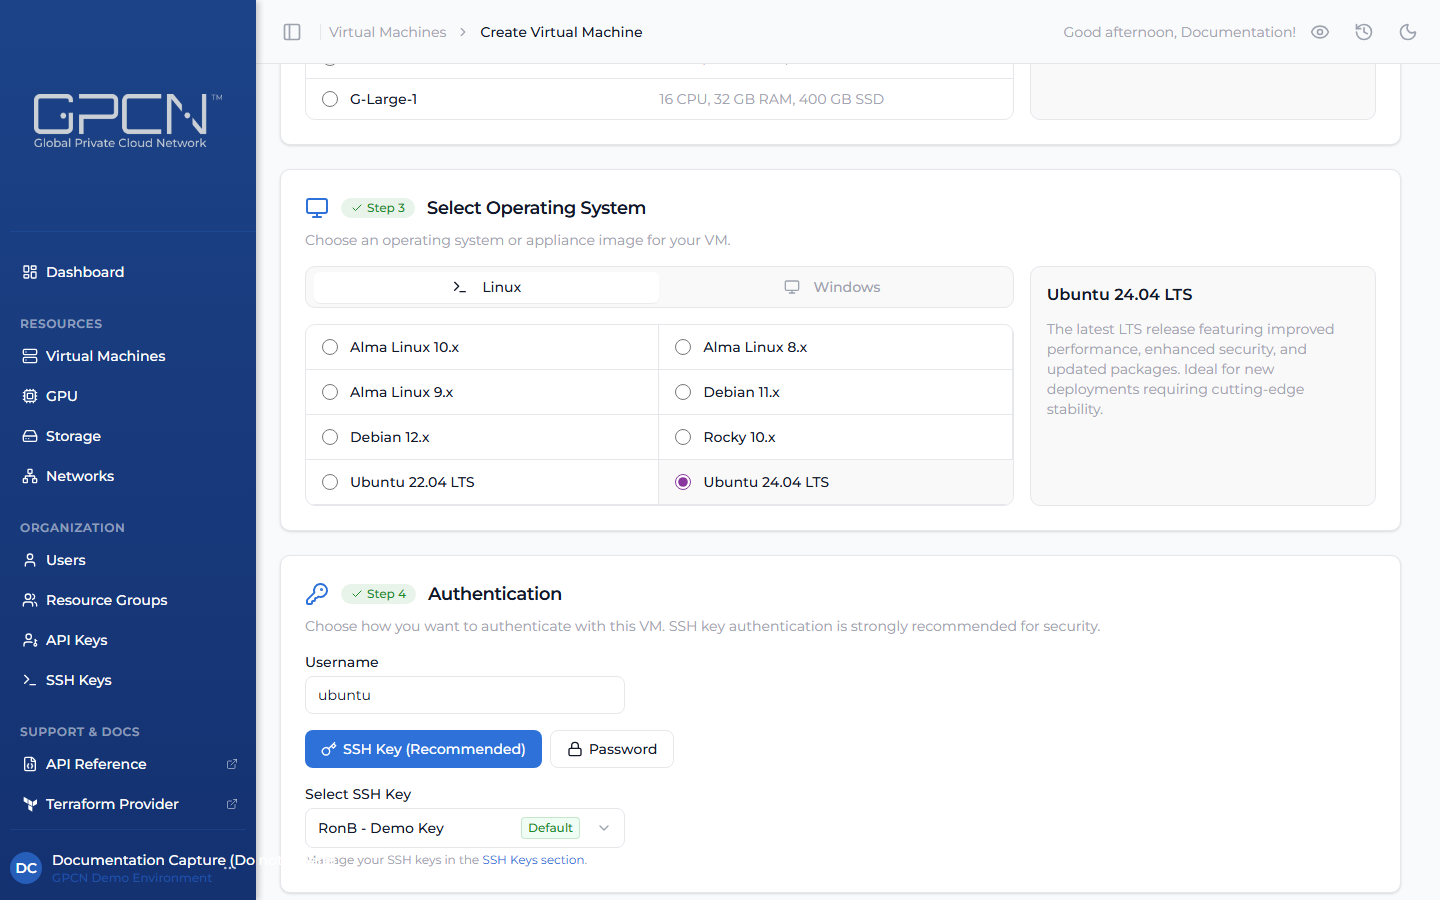
Choose an operating system image from the available categories:
Linux — recommended for most server workloads:
- Alma Linux 8.x / 9.x / 10.x
- Debian 11.x / 12.x
- Rocky 8.x / 9.x / 10.x
- Ubuntu 22.04 LTS / 24.04 LTS
Windows — for Windows-based workloads (Bring Your Own License):
- Windows 11 Pro
- Windows 2019 Standard
- Windows 2022 Standard
- Windows 2025 Standard
Network/Security — purpose-built firewall and routing appliances:
- OPNSense 25.x
- PFSense CE 2.7.2
Clicking an image shows a description in the panel on the right. Step 4 unlocks once an image is selected.
Step 4 — Authentication
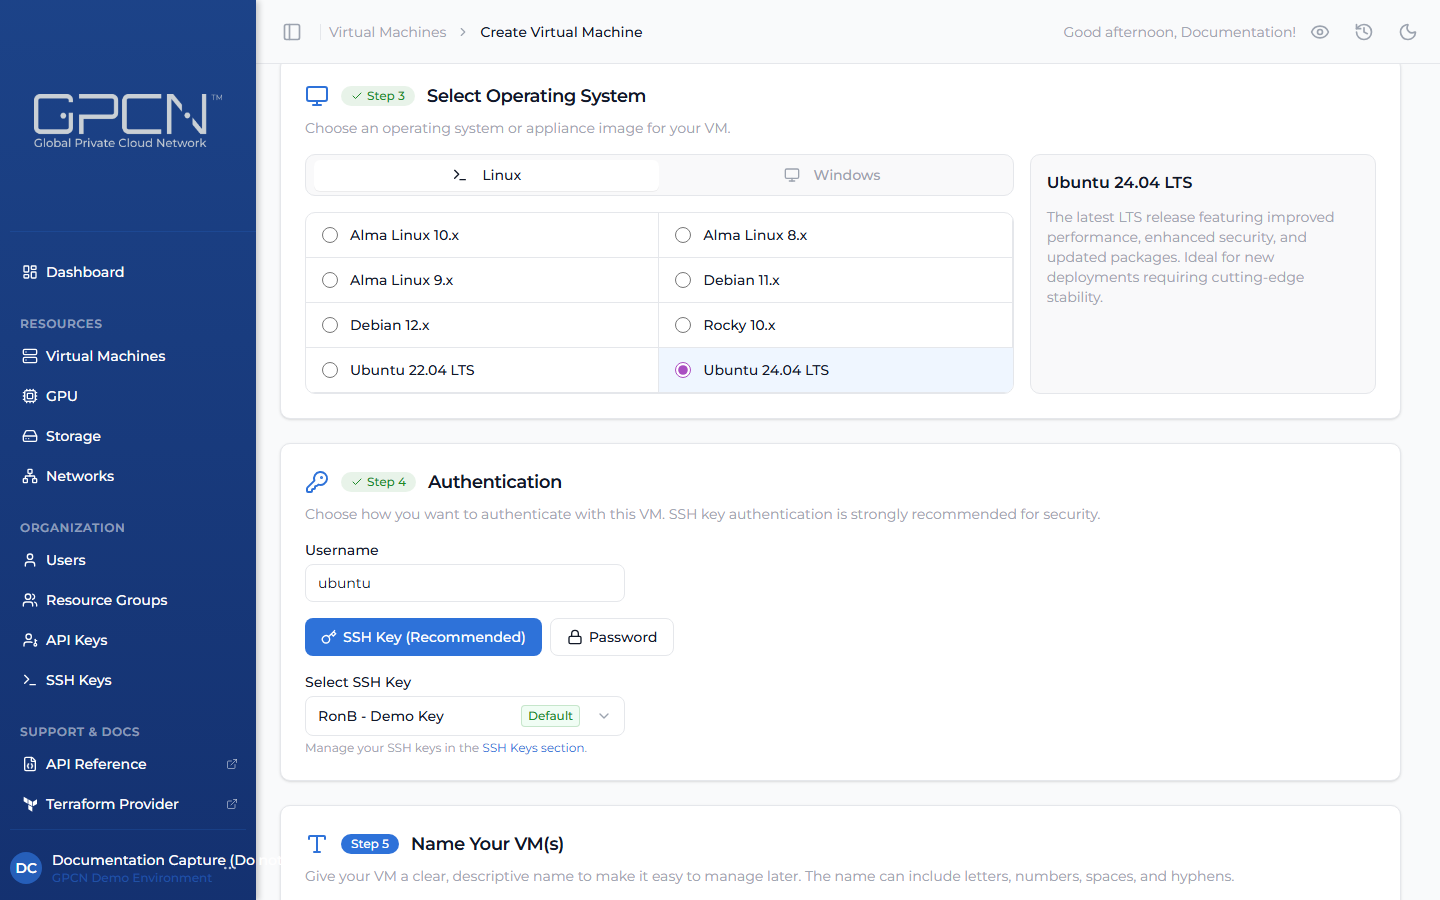
Choose how you'll authenticate to this VM. The options available depend on the operating system you selected in Step 3.
Username — for Linux images, you can customize the login username that gets created on the VM. A default is pre-filled based on the image (e.g., ubuntu). Leave it as-is or change it to something your team prefers. Usernames must be 3–20 characters, start with a letter or underscore, and contain only letters, digits, underscores, or hyphens.
Some names are reserved by the platform and cannot be used. If you enter one, the field will display a "reserved username" error and you'll need to choose a different name before you can proceed.
SSH Key (Recommended) — available for Linux images that support cloud-init. Select a key from your SSH Keys library using the dropdown. If you've set a default key, it's pre-selected automatically.
SSH key authentication is significantly more secure than passwords and is strongly recommended for Linux VMs. If you don't have a key yet, add one to your library before creating the VM.
Password — set a password for SSH or console access. You can let GPCN™ auto-generate a strong password, or specify your own. Copy it before you deploy — GPCN™ doesn't store passwords.
VM passwords must be 12–20 characters and may only contain letters, numbers, and the following special characters: ! @ # % - _ .
Windows VMs use password authentication only — SSH key authentication isn't available for Windows. Some images (such as firewall appliances) don't support cloud-init; for these, authentication is set up at first boot through the console.
Step 5 unlocks once authentication is configured.
Step 5 — Name Your VM(s)
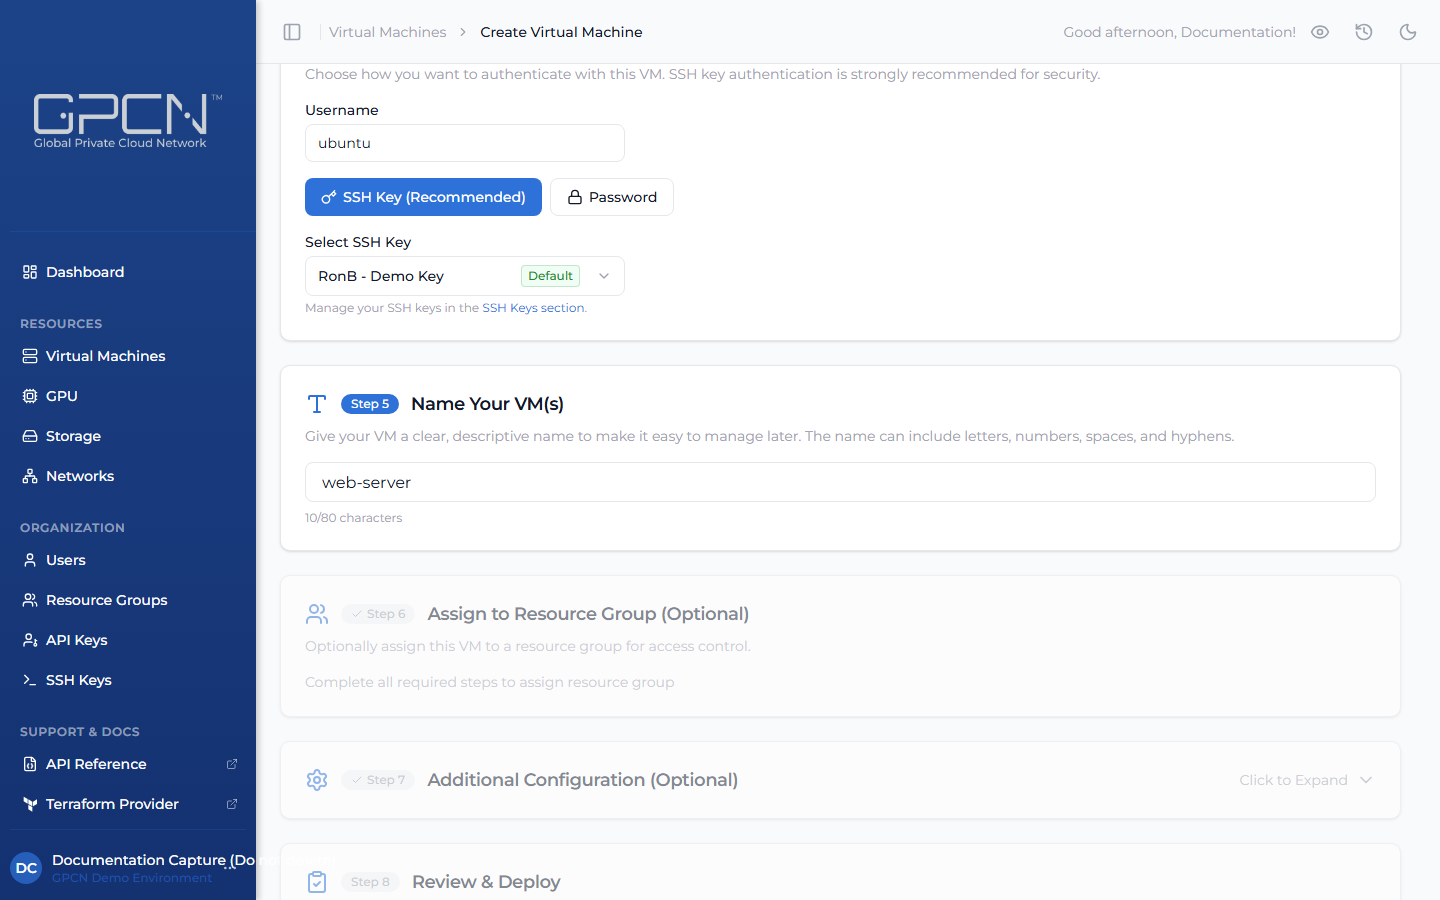
Enter a descriptive name for your VM. Names:
- May contain letters, numbers, spaces, and hyphens
- Maximum 80 characters
- Must be unique within your account
A live character counter below the field shows your progress (e.g., 12/80 characters).
When deploying multiple VMs in Step 7, GPCN™ automatically appends a numeric suffix — for example, entering web-server creates web-server-1, web-server-2, etc. Enter only the base name.
Step 6 unlocks as soon as you type a valid name.
Step 6 — Assign to Resource Group (Optional)
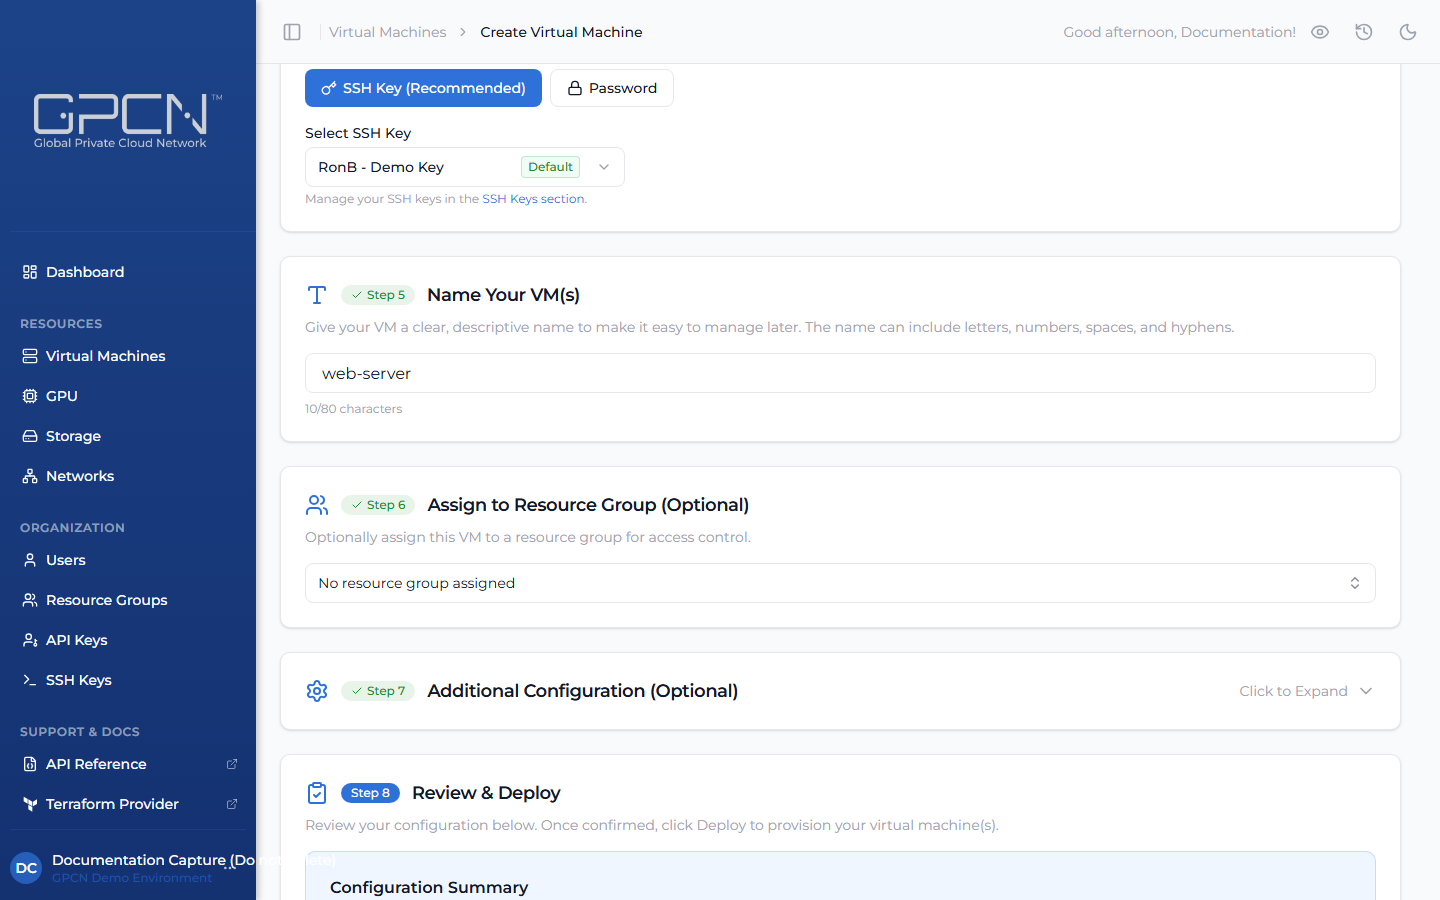
Optionally assign the VM to a resource group to keep your resources organized. Use the dropdown to select from available resource groups, or leave it as No resource group assigned to skip.
See Resource Groups for details.
This step is optional and is marked complete automatically.
Step 7 — Additional Configuration (Optional)
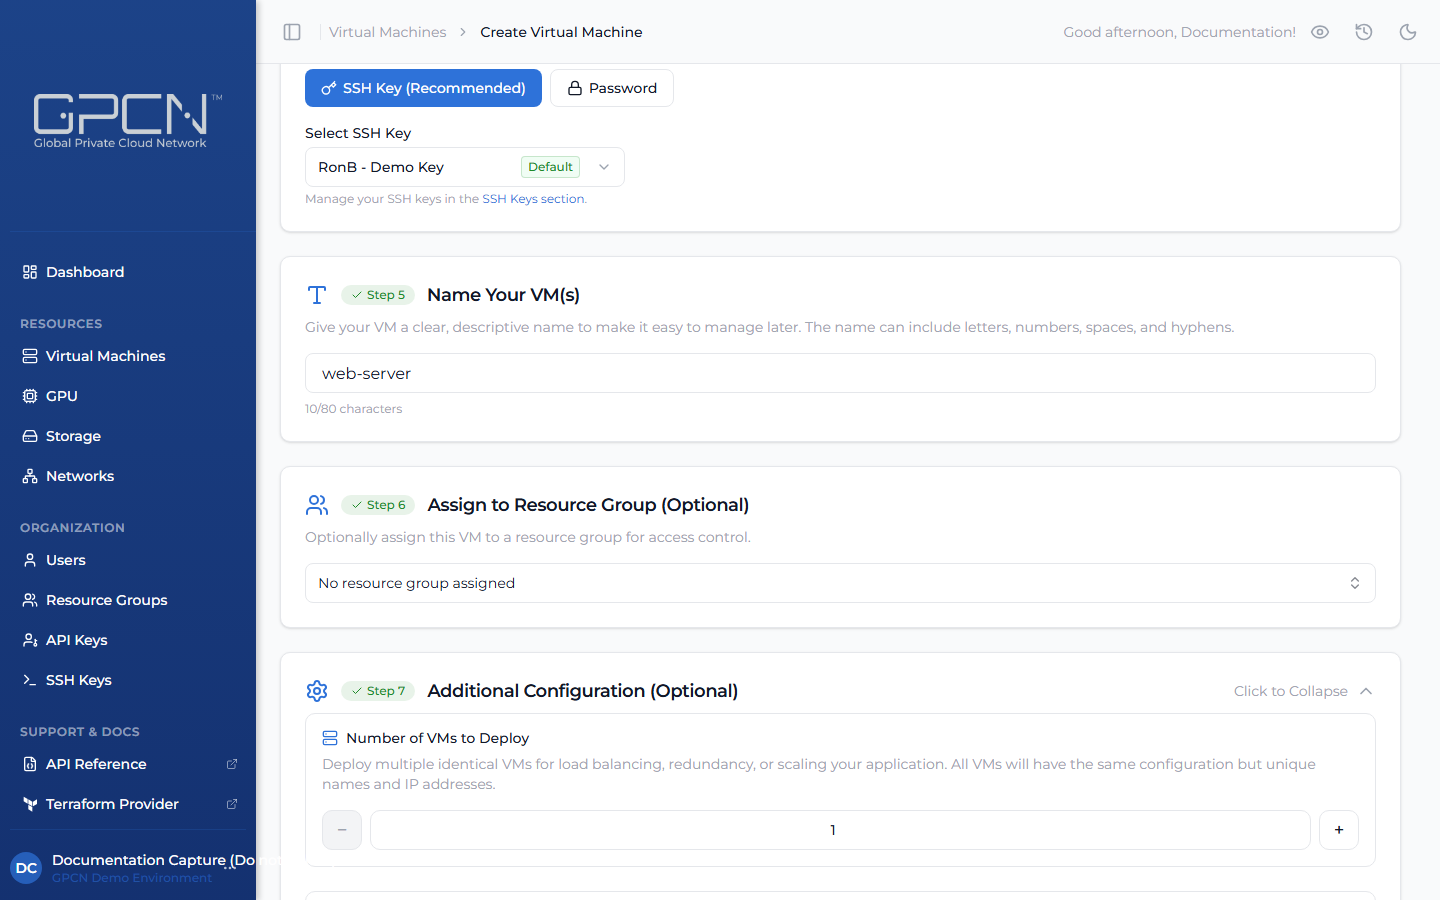
Select Click to Expand to reveal networking and instance count options. This step is optional — defaults are applied if you leave it collapsed.
Number of VMs to Deploy
Use the + and − buttons to deploy multiple identical VMs in a single operation, useful for load-balanced clusters or redundant pairs. You can deploy up to 10 VMs at once. Each VM receives a unique name based on your Step 5 base name and its own IP address.
Network Options
Your VM is automatically connected to the Default Network as its Primary interface. To customize:
- Add networks — click the network selector bar to attach additional private networks, up to 5 interfaces total
- Reorder — drag entries to change priority; the top entry is always marked Primary
- Remove — click the × on any non-primary network to detach it before deployment
The primary interface is where your VM's default gateway is configured. Public IPs are assigned to the primary interface.
Allocate Public IP
Toggle on to assign a publicly routable IP address to each VM's primary interface. When off (default), VMs have outbound internet access via the network's built-in SNAT but are not directly reachable from the internet.
Step 8 — Review & Deploy
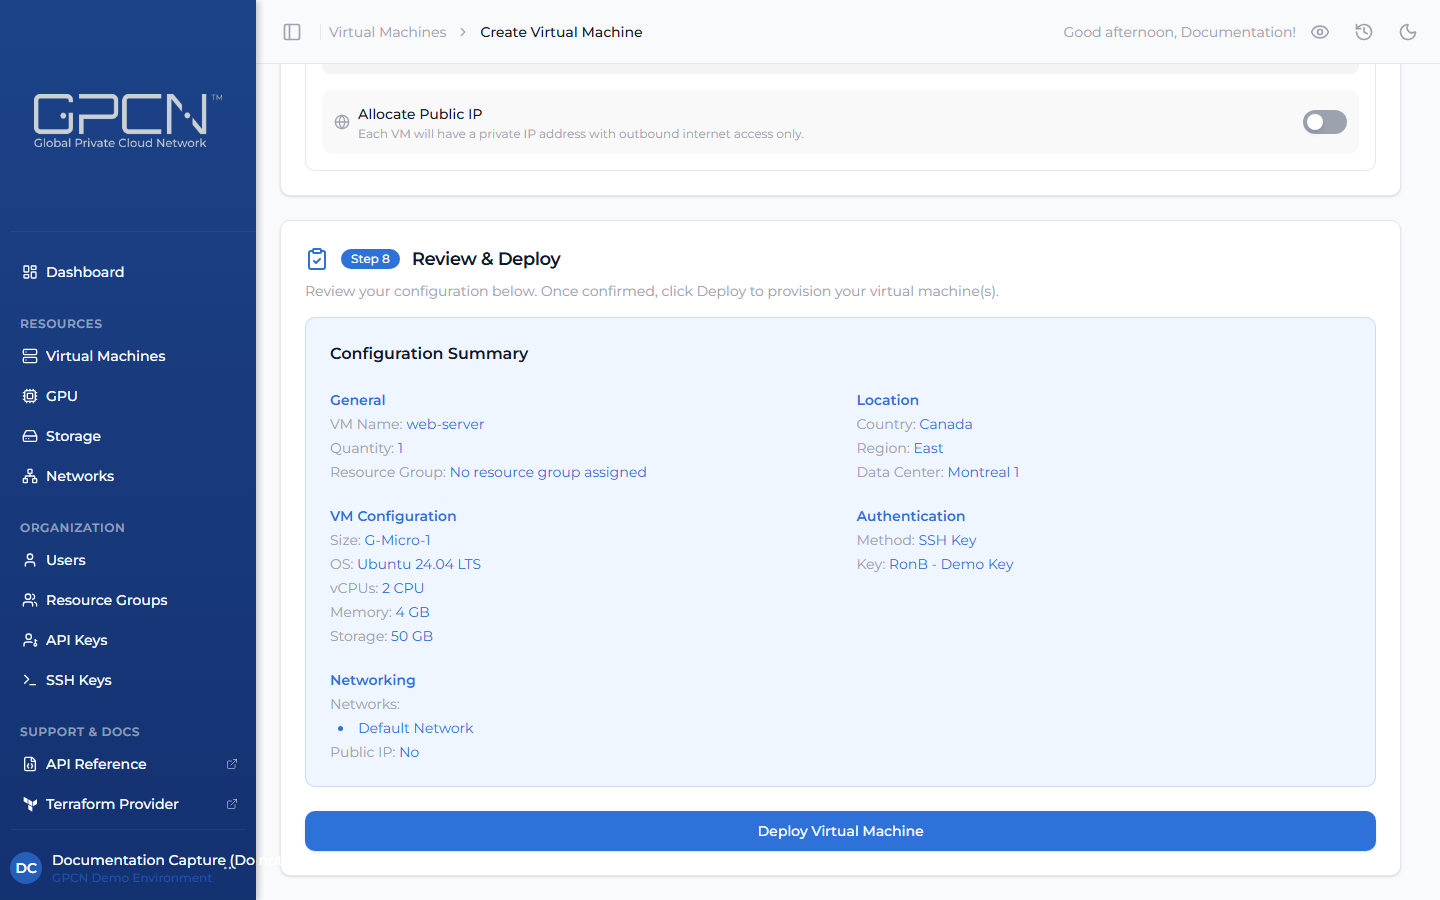
Review the Configuration Summary before committing. The summary is organized into five sections:
| Section | What to check |
|---|---|
| General | VM name, quantity, resource group |
| Location | Country, region, data center |
| VM Configuration | Size, OS image, vCPUs, memory, disk |
| Authentication | Auth method and SSH key name (for cloud-init images) |
| Networking | Attached networks, public IP status |
If anything is incorrect, scroll up to the relevant step — all previous steps remain editable until you click Deploy.
Click Deploy Virtual Machine to start provisioning. The VM appears in your list with a Starting status. VM provisioning typically completes within 1–3 minutes.
If you used password authentication, make sure you've saved the password before deploying — it won't be shown again after this step. SSH key users connect using their private key once the VM is running.
Next Steps
- Manage VMs — start, stop, upgrade, and delete your VMs
- Console Access — connect to your VM via the GPCN™ console
- Network Interfaces — add or remove networks after creation
.png)